Show pageOld revisionsBacklinksAdd to bookExport to PDFBack to top This page is read only. You can view the source, but not change it. Ask your administrator if you think this is wrong. # NGINX SETUP ## Hosting multiple websites on a single Virtual Private Server is simple and efficient. Nowadays, HTTPS is a required feature for any website. ---------- **Let’s see how to:** - **Setup a nginx reverse-proxy and generate a nginx config for each website** to link a domain name and a container. - **Create and renew SSL certificates** to enable HTTPS on each website.  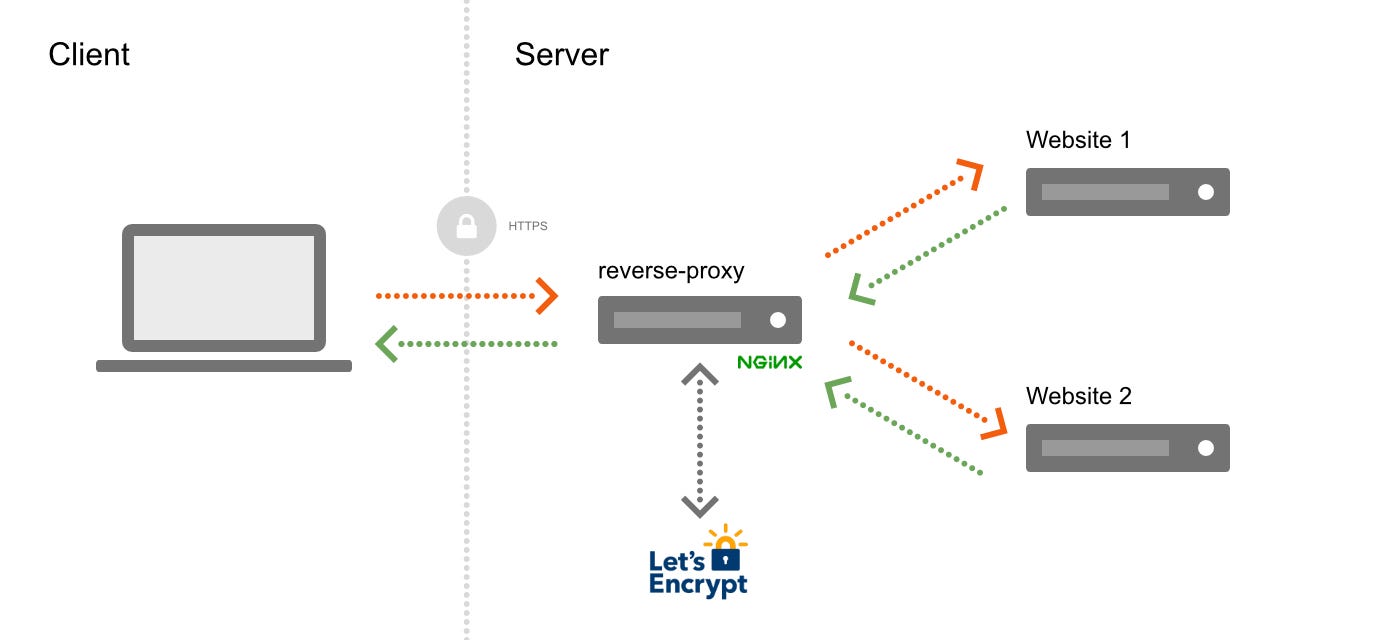 ---------- > **Prerequisites** > - Several websites run inside Docker containers on a single server. (Each one could either be a static files server, or Wordpress running on Apache or combination of a Node.js app and a reverse-proxy like in [my previous article](https://medium.com/@francoisromain/setup-node-js-apache-nginx-reverse-proxy-with-docker-1f5a5cb3e71e)). > - The domain name for each website is configured to point to the IP of the server. ---------- The manual way to setup a nginx reverse-proxy is to install nginx directly on the host, or inside a Docker container, then fill-in each website configuration (probably in the `sites-available`/`sites-enabled` files) pointing to the exposed ports of the containers. The downsides to this approach are: - The need to modify the nginx config every time a website is added or removed. - The need to restart nginx after each config modification, causing a short downtime for every websites. - The need to expose a port of each container to the host, and therefore keep track of the used ports (two containers can not use the same port). **To avoid these downsides, the magic** `[**jwilder/nginx-proxy**](https://github.com/jwilder/nginx-proxy)` **automates the creation of nginx configs and reloads the proxy server when a container starts and stops. And it has HTTPS support.** **Even better, the nginx-proxy has a** `[**LetsEncrypt companion**](https://github.com/JrCs/docker-letsencrypt-nginx-proxy-companion)`**, which allows the automatic creation and renewal of HTTPS certificates.** **In one word: set-it-and-forget-it.** # Project structure Create a `nginx-proxy` directory next to the websites directories. In my setup this is in `/srv/www/` on the host. . +-- nginx-proxy | +-- docker-compose.yml | +-- nginx.tmpl | +-- conf.d | +-- vhost.d | +-- html | +-- certs +-- your-website-one.tld +-- your-website-two.tld +-- your-website-three.tld Inside `/nginx-proxy`, create four empty directories: `conf.d`, `vhost.d`, `html` and `certs`. These are used to store the nginx and the Let’s Encrypt configuration files. # **docker-compose.yml** Inside `/nginx-proxy/`, create a `docker-compose.yml` file with this content: version: '3'services: nginx: image: nginx labels: com.github.jrcs.letsencrypt_nginx_proxy_companion.nginx_proxy: "true" container_name: nginx restart: unless-stopped ports: - "80:80" - "443:443" volumes: - /srv/www/nginx-proxy/conf.d:/etc/nginx/conf.d - /srv/www/nginx-proxy/vhost.d:/etc/nginx/vhost.d - /srv/www/nginx-proxy/html:/usr/share/nginx/html - /srv/www/nginx-proxy/certs:/etc/nginx/certs:ro nginx-gen: image: jwilder/docker-gen command: -notify-sighup nginx -watch -wait 5s:30s /etc/docker-gen/templates/nginx.tmpl /etc/nginx/conf.d/default.conf container_name: nginx-gen restart: unless-stopped volumes: - /srv/www/nginx-proxy/conf.d:/etc/nginx/conf.d - /srv/www/nginx-proxy/vhost.d:/etc/nginx/vhost.d - /srv/www/nginx-proxy/html:/usr/share/nginx/html - /srv/www/nginx-proxy/certs:/etc/nginx/certs:ro - /var/run/docker.sock:/tmp/docker.sock:ro - /srv/www/nginx-proxy/nginx.tmpl:/etc/docker-gen/templates/nginx.tmpl:ro nginx-letsencrypt: image: jrcs/letsencrypt-nginx-proxy-companion container_name: nginx-letsencrypt restart: unless-stopped volumes: - /srv/www/nginx-proxy/conf.d:/etc/nginx/conf.d - /srv/www/nginx-proxy/vhost.d:/etc/nginx/vhost.d - /srv/www/nginx-proxy/html:/usr/share/nginx/html - /srv/www/nginx-proxy/certs:/etc/nginx/certs:rw - /var/run/docker.sock:/var/run/docker.sock:ro environment: NGINX_DOCKER_GEN_CONTAINER: "nginx-gen" NGINX_PROXY_CONTAINER: "nginx"networks: default: external: name: nginx-proxy This will launch three services: - `nginx`: the nginx-reverse proxy, uses the default nginx image. The label is needed so that the letsencrypt container knows which nginx proxy container to use. - `nginx-gen`: uses the `[jwilder/docker-gen](https://github.com/jwilder/docker-gen)` image. Its `command` instruction will render a nginx configuration (based on `nginx.tmpl`) for each website / container added to the network. - `nginx-letsencrypt`: generates and renew the HTTPS certificates. All these services are bound to the `nginx-proxy` network. # nginx.tmpl Inside `/nginx-proxy/`, create a `nginx.tmpl` file and copy the content from [this file](https://raw.githubusercontent.com/jwilder/nginx-proxy/master/nginx.tmpl). This is the used by the `nginx-gen` container to create the nginx configuration file for each website / container added to the network. # Boot up First create the network: $ docker network create nginx-proxy Then create the reverse proxy with the `nginx`, `nginx-gen` and `nginx-letsencrypt` containers from the `docker-compose.yml` file: $ cd /srv/www/nginx-proxy/ $ docker-compose up -d Now the reverse-proxy is running. # Link a website to the reverse-proxy To link a website to the running nginx-proxy, we need to update its own `docker-compose.yml` file (**not** the one from nginx-proxy above) with a few instructions: **1. Environment variables** services: my-app: … environment: VIRTUAL_HOST: your-website.tld VIRTUAL_PORT: 3000 LETSENCRYPT_HOST: your-website.tld LETSENCRYPT_EMAIL: your-email@domain.tld - `VIRTUAL_HOST`: your domain name, used in the nginx configuration. - `VIRTUAL_PORT`: (opt.) the port your website is listening to (default to `80`). - `LETSENCRYPT_HOST`: your domain name, used in the Let’s Encrypt configuration. - `LETSENCRYPT_EMAIL`: your email, used in the Let’s Encrypt configuration. **2. Ports** services: my-app: … expose: - 3000 Same as the `VIRTUAL_PORT` above. **3. Network** networks: default: external: name: nginx-proxy **Now lets start the website with:** $ cd /srv/www/your-website.tld $ docker-compose up -d **The website is automatically detected by the reverse proxy, has a HTTPS certificate and is visible at** `**https://your-website.tld**`**.** **Magic!** # Next Step How can we replicate this production environment, on a local dev computer? I wrote a follow up article about this: [set a local web development environment with custom Urls and HTTPS](https://medium.com/@francoisromain/set-a-local-web-development-environment-with-custom-urls-and-https-3fbe91d2eaf0). # Useful links - [A complete guide to switching from HTTP to HTTPS](https://www.smashingmagazine.com/2017/06/guide-switching-http-https/): a very rich article explaining what HTTPS is technically, the different types of certificates and different ways to set it up on a server. - A [Docker Compose with nginx-proxy and Let’s Encrypt](https://github.com/evertramos/docker-compose-letsencrypt-nginx-proxy-companion) example by Ever Tramos automates the steps exposed in this article. #### 1K #### 30 - [Docker](https://medium.com/tag/docker) - [Nginx](https://medium.com/tag/nginx) - [Vps Hosting](https://medium.com/tag/vps-hosting) - [Lets Encrypt](https://medium.com/tag/lets-encrypt) - [Https](https://medium.com/tag/https) infrastructure/nginx.txt Last modified: 2022/11/30 16:28by 127.0.0.1
 127.0.0.1